Showing posts with label organization. Show all posts

Monday, April 5, 2010

Office Organization

I've received a lot of fabulous comments about my office, and I'm thrilled y'all seem to enjoy it as much as I do!  Several questions and comments focused on organization, so I figured I'd take the week to show you what works for me.  Let me start by saying, I used to be the most unorganized and messy person on the planet...as my sorority sister graciously pointed out.  However, if I can change...anyone can!


However, I've discovered life is much easier when you're organized.  The one and only thing I'll say before moving on is...organization takes work.  Once you're organized, you have to maintain it.  This means always looking to improve your system or purge what you don't use.  I think a lot of people get stuck on this one concept.

Okay, here is my first tip...

Whatever you use most often, should be stored closest to where you work.  Most often in my office, I'm sewing.  So, these supplies need to be front and center for me.

So, for my thread I've hung thread organizers on the wall (within arms length from where I sew).  I can quickly grab the thread I'm looking for because it is so close.  You'll see that I try to put all thread in the same color family together, so I can quickly find what I'm looking for at the time.


The next most often materials I use in my office are my sewing scissors.  I'm a little obsessed (as you can tell).  I used a magnetic knife organizer to hang all of my metal sewing scissors.  Because I'm a little fanatic, I hang my scissors in order of size...just my preference.


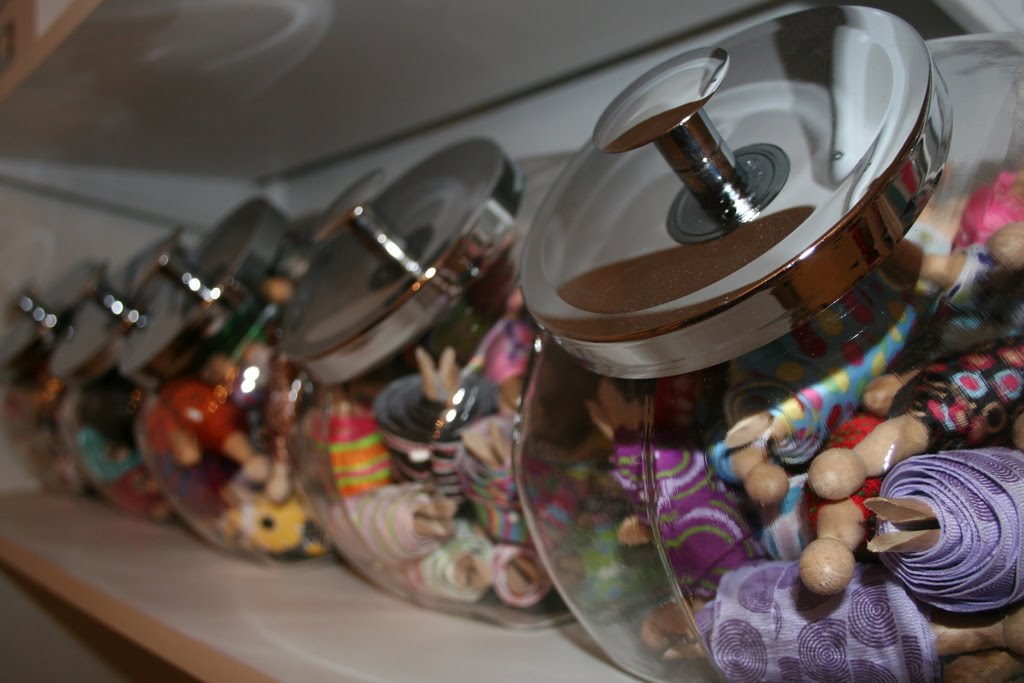
Another often used item in my office is ribbon.  I have way too much of it, but I use it across many crafts.  So, I took all the ribbon off their spool and put them onto old fashioned clothespins.  I taped the end to the ribbon to the clothespin and wrapped them until I ran out of ribbon.  Then, I used a straight pin to keep the ribbon in place.  I had so much, I wanted to sort them even more.  So, I put the ribbon clothespins in glass cookie jars.  Each jar is specific to a category: (1) polka dot, (2) stripes, (3) plain, (4) design, and (5) flowers.


The final spotlight for today is my photo boxes.  Last year, I purchased a bunch of these basic white photo boxes on clearance (specifically for my office).  None of them hold photos.  Instead, I store all sorts of materials (from paintbrushes to Mod Podge to glue to felt) in them.  However, I quickly found that they needed labels.  This makes it so much easier to quickly find the box I need.


Tomorrow, I'm going to walk you through my least favorite area of my office.  However, it is my command central.  You'll see how I had to let go of some of my rigidness and let it be.

Wednesday, February 3, 2010

Crafting Organization

My crafting supplies are taking over my house!  I spent the past month or so (since the unfortunate flood) purging my office of all sorts of supplies.  Now, I've moved to hanging organization.  That is the only area of my office that is not overflowing.


With a jewelry organizer, I was able to separate my chipboard letters.  The organizer is front and back, and it holds A LOT of chipboard.  I love using the organizer because of it's quick and easy accessibility.  Plus, the clear pockets, make it even easier to see exactly what I need while in the midst of the creative juices.


As always, I'm looking for more organization tips for your crafting supplies...nothing makes me more giddy than some great organization (I'm well aware I'm a dork)!  So, what are your favorite tricks?

Monday, December 14, 2009

Holiday Cards


Just in case you missed yesterday's post...I love holiday cards.  I have an adorable Christmas tree that hangs on the wall and holds my cards during the month of December.

However, when January comes around, I am forced to find a new place for them.  Several years ago, I came up with the idea of saving them and then putting them out annually for visitors to view.


The project is super easy and takes no time at all.  You need a shower curtain ring, notecard decorated with the year, a hole puncher, and ribbons.  Create your cover with the year, hole punch all the cards, attach them to the shower curtain ring, and decorate the ring with holiday ribbon.

In order to remember who the people are in each picture, I create labels for the back of the card.  Some of the babies are hard to decipher several years later.

Here are a few more pictures of the ones I've made over the past several years.


Saturday, November 28, 2009

Grocery List Organization

One of my biggest pet peeves is when I get home from the grocery store and realize I forgot the one thing I went to purchase.  Several years ago I came across a typed out grocery list on-line.  I thought it was a phenomenal idea, so I created a list to fit my needs.  Now, I keep several copies on my refrigerator and highlight items as I run out.  Then, I have a list to take with me to the store.  Here is a copy of my list in case this is something that might be beneficial for you and your family.


Monday, November 2, 2009

Unexpected Storage and Organization

I have a fascination with jewelry...not the real stuff.  I love fun beaded necklaces, ornate earrings, and funky rings; however, finding a way to store them is always an issue.  Before I put my house on the market, I had them hanging in my bathroom.  I have a small nook, and I used tie hangers to hang my necklaces.  This was perfect, but my wonderful real estate agent told me people would think I had no storage (which if you've seen my closet...you'd laugh).  Anyway, I followed her lead and moved the jewelry to a more discrete location.  Here...


I bought this secretary desk from a local antique dealer (in the "last chance" section) several years ago.  It is really on its last leg, and I have no desire to do anything about it.  However, as I started moving my jewelry into a box, I realized this (previously empty) secretary could fit the bill for jewelry storage.  So, I purchased a few utensil organizers from my favorite store (Target) and organized all of my necklaces (by color).


Typically when I pick out jewelry, I do it based on the color rather than anything else.  This helps me make a much quicker choice.  I will admit that the bracelet storage was not as easy because I wear mostly bangles (that stand up in the drawer organizers).  If you have any suggestions, shoot them my way.  Also, my pendants and rings make up the final drawer.


However, I saved the best for last.  Earrings are my thing.  I love them, and the bigger the better (especially with long hair).  So, I created a fun organization tool and stuck it in the top of the desk.  Also, I hung each pair by color.  For directions on how to create the earring organizer, see below.


Earring Organizer:
Materials:

  • Old picture frame (without the glass or back)
  • Material (I used some left over from my screened in porch, but anything with some stretch would do...in fact, this would be a great place to bring in a coordinating fabric to your bathroom)
  • Scissors
  • Staple gun
  • Staples
Directions:
  • Place frame on ground (face down)
  • Cut fabric slightly larger than the opening
  • Using the stable gun, staple the fabric onto the backside of the frame (where the back of the frame would go if you were using it).  Make sure to pull the fabric tight as you staple (so there are no creases)
  • Trim extra fabric
  • Hang earrings


Sunday, November 1, 2009

Food Swap

I despise to cook!  I like the idea of it, but I hate how messy it gets my house.  I really love the slow-cooker, and I don't truly consider that cooking.  Living so close to my parents and siblings, I've survived the past few year "showing up" for dinner at their houses.  However, entering my 30s made me realize it was time to buck up and shut up!  So, my sister and I decided we would initiate a food swap.  It works really well.  We both cook two days a week (the same ones), and swap our food two others.  Then, the weekend is on your own.  So, on Saturday or Sunday we discuss which days work for our swap and then plan for the week.  Here is my menu calendar I started.


I write down what I'm going to cook and the ingredients.  Then, I highlight what I already have and create a grocery list (in the bottom right hand corner) of what I still need.  Then, I take the menu calendar with me.  My sister and I both have outdoor fridges, so during our swap days we stick each other's food in the fridge while we're out running errands.  It is fabulous!  Now I am eating home cooked meals, but I'm not having to do all the cooking.

Also, to make my life a little more sane I've organized the ingredients in tubs for the week.  Then, I can grab the tub and cook from it.  This allows me to actually "know" I have everything I need.  Here is a picture of that too.